Entity Framework Tutorial
This tutorial guides you through the process of creating a simple application powered by ADO.NET Entity Framework using Visual Studio 2010. In less than 5 minutes you will have a ready-to-use data access layer for your business objects.
In this walkthrough:
- Introducing the ADO.NET Entity Framework
- Requirements
- Generating Model from Database
- Querying Data
- Inserting New Data
- Updating Data
- Deleting Data
- Additional Information
Introducing the ADO.NET Entity Framework
ADO.NET Entity Framework is an object-relational mapping (ORM) framework for the .NET Framework. It is designed to enable developers to create data access applications by programming against a conceptual application model instead of programming directly against a relational storage schema. The goal is to decrease the amount of code and maintenance required for data-oriented applications.
Requirements
In order to connect to PostgreSQL server you need the server itself running, dotConnect for PostgreSQL installed and IDE running. ADO.NET Entity Framework requires .NET Framework 3.5 Service Pack 1, Visual Studio 2008 Service Pack 1, and PostgreSQL server 8.0 or higher. Note that Entity Framework support is not available in Standard Edition of dotConnect for PostgreSQL.
In this tutorial it is assumed that you already have the database objects created. You have to execute a script from the following file if you have not done so yet:
\Program Files\Devart\dotConnect\PostgreSQL\Samples\crm_demo.sql
\Program Files\Devart\dotConnect\PostgreSQL\Samples\crm_demo.sql
Generating Model from Database
Create a new console application in Visual Studio. It could be any other project type as well, but for simplicity's sake we'll use console project throughout the tutorial.
- In the Solution Explorer right-click on the project and choose Add | New Item.
- In the dialog choose ADO.NET Entity Data Model, click Add. This launches Entity Data Model Wizard.
- In the wizard choose Generate from database, click Next.
- Pick an existing dotConnect for PostgreSQL connection string or create a new one. When creating a new connection choose PostgreSQL Server in the Data Source list, then dotConnect for PostgreSQL in the Data provider combobox. This step is illustrated in the screenshot below.
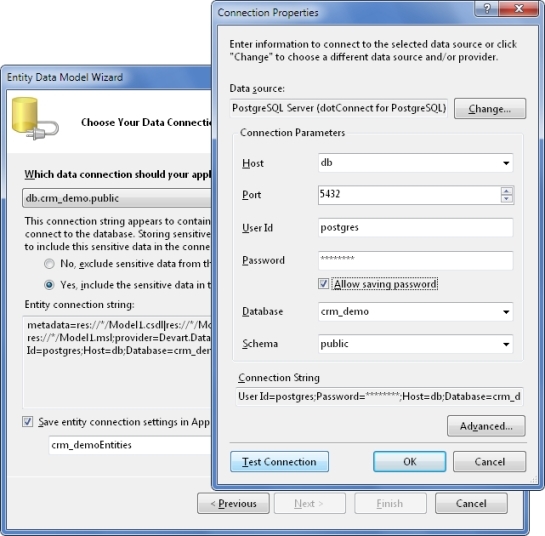
- Agree to include the sensitive data in the connection string.
- In the field Save entity connection settings... type CrmDemoEntities. This will be the name of the main data access class. Click Next.
- Choose database objects that will be used in the model. These are all objects from the crm_demo script, including auxiliary tables.
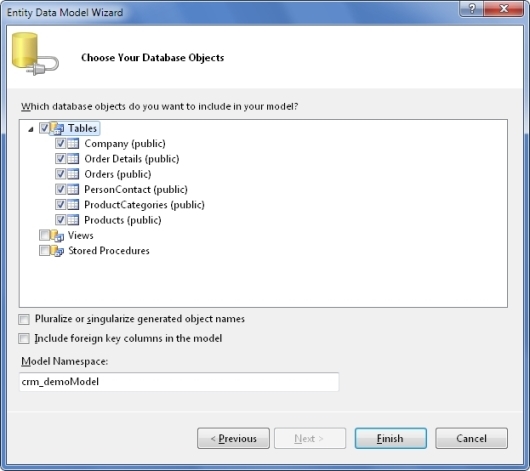
- Press Finish. The model will be generated and opened in EDM Designer.
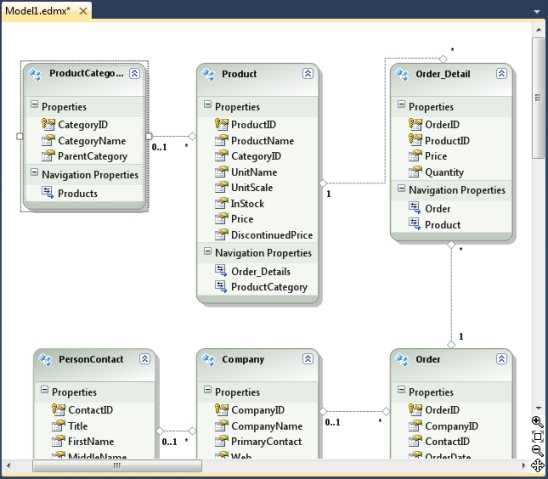
The model you've just generated is ready to use. Its name is Model1.edmx, unless you changed it in the step 2. You can inspect it visually in the designer or take a look behind the scenes with XML Editor.
The wizard creates classes for all selected tables that represent entities. It also creates a descendant of System.Data.Objects.ObjectContext class, which controls the connection to the database, and the whole data flow. This class includes properties and methods named after your database objects. You will use these members to retrieve and modify data in the context. The code is contained in an autogenerated file Model1.Designer.cs (Model1.Designer.vb).
Querying Data
All Entity Framework operations are executed through the ObjectContext descendant, which is namedCrmDemoEntities in this tutorial. To retrieve data you have to first create an instance of the context, then prepare a query with LINQ to Entities or EntitySQL or their mix, and then access the object returned by the query, which may be a collection of objects or a single object.
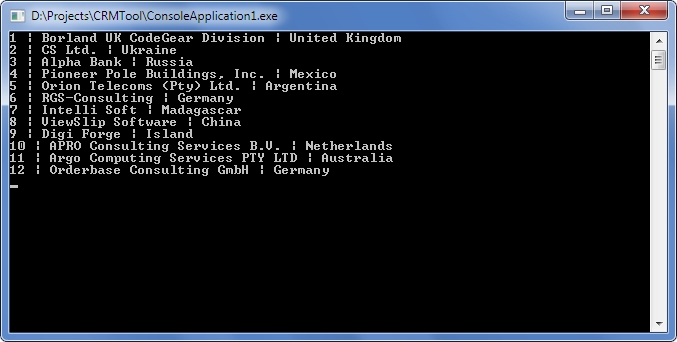
Let's read all the data from the table Company, sort it by CompanyID, and output some columns. Add the following block of code to the method Main:
[C#]
CrmDemoEntities context = new CrmDemoEntities();
var query = from it in context.Company
            orderby it.CompanyID
            select it;

foreach (Company comp in query)
  Console.WriteLine("{0} | {1} | {2}", comp.CompanyID, comp.CompanyName, comp.Country);

Console.ReadLine();
[Visual Basic]
Dim context As CrmDemoEntities = New CrmDemoEntities
Dim query = From it In context.Company _
    Order By it.CompanyID _
    Select it

Dim comp As Company
For Each comp In query
  Console.WriteLine("{0} | {1} | {2}", comp.CompanyID, comp.CompanyName, comp.Country)
Next

Console.ReadLine()
As simple as that. You prepare a query and then iterate through it as you would do with a usual collection of objects. The database interaction is performed by Entity Framework in the background. Now let's see who is who in this code sample.
- CrmDemoEntities is the name of the class that knows all about your model and does everything to handle it. You named it in the step 6. All Entity Framework operations are performed within this class's properties and methods. It is recommended that you keep a single instance of the class throughout your application because it consumes lots of resources.
- query, it - these are arbitrary variable names in the LINQ to Entities statement. The former is used as the collection of data objects, the latter is not used outside the statement.
- context.Company refers to a public property of CrmDemoEntities class. This property represents the collection of all companies in the context.
- Company (in the foreach statement) is the name of an autogenerated class. This class maps to the Company table in the database and is named after it.
Here is the project's output in the console:
Note that the LINQ to Entities query code just describes the query. It does not execute it. This approach is known as deferred execution.
Now let's query data from two tables united with a foreign key. Replace the old code with this:
[C#]
CrmDemoEntities context = new CrmDemoEntities();

var query = from it in context.Products.Include("ProductCategories")
            orderby it.ProductCategories.CategoryName, it.ProductName
            select it;

foreach (Products product in query)
  Console.WriteLine("{0} | {1} | {2}",
    product.ProductCategories.CategoryName, product.ProductName, product.Price);

Console.ReadLine();
[Visual Basic]
Dim context As CrmDemoEntities = New CrmDemoEntities
Dim query = From it In context.Products.Include("ProductCategories") _
Order By it.ProductCategories.CategoryName, it.ProductName _
Select it

Dim product As Products
For Each product In query
  Console.WriteLine("{0} | {1} | {2}", _
    product.ProductCategories.CategoryName, product.ProductName, product.Price)
Next
Console.ReadLine()
This sample is much like the previous one, with exception that it adds the Include method that instructs the query to retrieve data from one more table.
Inserting New Data
What earlier was adding rows to tables, now is just adding new objects to context collections. When you are ready to send the changes to the database, call the SaveChanges() method of the context. Before doing this, you must first set all properties that do not support null (Nothing) values. The SaveChanges() method generates and executes commands that perform the equivalent INSERT, UPDATE, or DELETE statements against the data source.
Let's add a new product and a new category to the database. Replace the old code with this:
[C#]
CrmDemoEntities context = new CrmDemoEntities();

// Create a new category
ProductCategories newCategory = new ProductCategories();
newCategory.CategoryID = 1000;
newCategory.CategoryName = "New category";
context.AddToProductCategories(newCategory);

// Create a new product
Products newProduct = new Products();
newProduct.ProductID = 2000;
newProduct.ProductName = "New product";
newProduct.Price = 20;
// Associate the new product with the new category
newProduct.ProductCategories = newCategory;
context.AddToProducts(newProduct);

// Send the changes to the database.
// Until you do it, the changes are cached on the client side.
context.SaveChanges();

// Request the new product from the database
var query = from it in context.Products.Include("ProductCategories")
            where it.ProductID == 2000
            select it;

// Since we query for a single object instead of a collection, we can use the method First()
Products product = query.First();
Console.WriteLine("{0} | {1} | {2}",
  product.ProductCategories.CategoryName, product.ProductName, product.Price);
Console.ReadLine();
[Visual Basic]
Dim context As CrmDemoEntities = New CrmDemoEntities

' Create a new category
Dim newCategory As ProductCategories = New ProductCategories()
newCategory.CategoryID = 1000
newCategory.CategoryName = "New category"
context.AddToProductCategories(newCategory)

' Create a new product
Dim newProduct As Products = New Products()
newProduct.ProductID = 2000
newProduct.ProductName = "New product"
newProduct.Price = 20
' Associate the new product with the new category
newProduct.ProductCategories = newCategory
context.AddToProducts(newProduct)

' Send the changes to the database.
' Until you do it, the changes are cached on the client side.
context.SaveChanges()

' Request the new product from the database
Dim query = From it in context.Products.Include("ProductCategories") _
            Where it.ProductID = 2000 _
            Select it

' Since we query for a single object instead of a collection, we can use the method First()
Dim product As Products = query.First()
Console.WriteLine("{0} | {1} | {2}", _
  product.ProductCategories.CategoryName, product.ProductName, product.Price)
Console.ReadLine()
The methods AddToProductCategories, AddToProducts, and others are automatically generated in the context. Such methods exist for every class in your model.
Note that after you have added the new product and category by submitting the changes, you cannot execute this solution again as is. To execute the solution again, change the names and IDs of the objects to be added.
Updating Data
Entity instances are modified as usual. The only thing to remember is that you have to invoke the SaveChanges() method to send the data to the database.
Append the following block to the existing code and launch the project:
[C#]
product.ProductName = "Edited product";
product.Price = 15;
context.SaveChanges();
[Visual Basic]
product.ProductName = "Edited product"
product.Price = 15
context.SaveChanges()
Deleting Data
To extract an instance from a context use the DeleteObject method of the context. The object is removed from the collection of its type, but not destroyed. To delete the object's data from the database invoke the SaveChanges() method.
You can do this with a block of code like the following:
[C#]
context.DeleteObject(newCategory);
context.DeleteObject(newProduct);
context.SaveChanges();
[Visual Basic]
context.DeleteObject(newCategory)
context.DeleteObject(newProduct)
context.SaveChanges()
No comments:
Post a Comment